Are you wondering how sending crypto from Coinbase to Coinbase Wallet works in 2025? It’s a simple yet powerful step toward gaining full control of your digital assets. By transferring crypto out of the centralized Coinbase exchange into your self-custodial Coinbase Wallet, you unlock access to DeFi, NFTs, and full asset ownership.
This guide will help you understand the key differences between Coinbase and its Wallet, how to transfer securely, avoid fees, and what to expect after the transfer.
Let’s dive into the complete process with Webtaichinh and maximize your crypto’s potential.
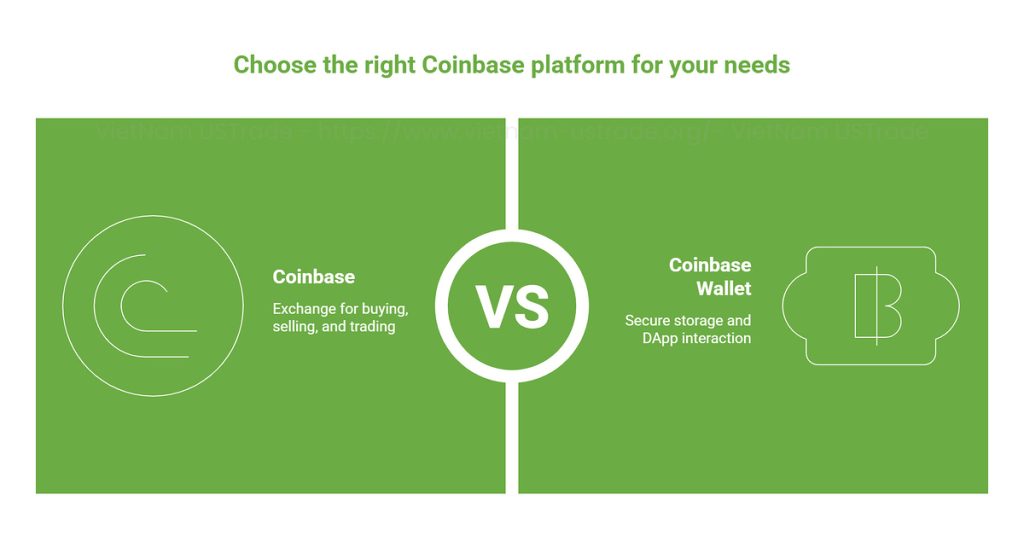
1. Coinbase vs. Coinbase Wallet: Understanding the difference
Before initiating your transfer, it’s important to understand how Coinbase and Coinbase Wallet differ in structure, security, and functionality.
Compare Coinbase and Coinbase Wallet two ways to manage your crypto
1.1 What is Coinbase? (Centralized exchange and custodial platform)
Coinbase is one of the world’s most popular cryptocurrency exchanges. It operates as a centralized, custodial platform where you can easily buy, sell, and trade cryptocurrencies using fiat or crypto pairs. When you hold funds on Coinbase:
Coinbase manages your private keys and secures your assets on your behalf.
You access your funds via a web dashboard or mobile app.
You get seamless access to fiat on- and off-ramps, instant buying/selling, and built-in support.
This model makes crypto accessible to everyone but leaves final asset control with Coinbase not you.
1.2 What is Coinbase Wallet? (Self-custody wallet solution)
Coinbase Wallet is a decentralized, self-custody wallet. Unlike your exchange account, it gives you direct ownership over your digital assets and private keys. Key features include:
Only you hold your wallet’s seed phrase and private keys.
Access to a wide variety of cryptocurrencies beyond what’s listed on Coinbase’s exchange.
Participation in DeFi protocols, NFT marketplaces, Web3 dApps, and blockchain games directly from your wallet.
This option is best for users who want more control, privacy, and a gateway to the broader crypto ecosystem.
1.3 Key differences between Coinbase and Coinbase Wallet
Feature
Coinbase
Coinbase Wallet
Ownership
Custodial – Coinbase holds keys
Non-custodial – You hold keys
Use Cases
Buy/sell/trade; fiat ramps
DeFi, NFTs, DApps, private transfers
Security & Recovery
Account recovery via ID & email
Seed phrase is only way to recover
Understanding these differences is vital before making your transfer for security, functionality, and peace of mind.
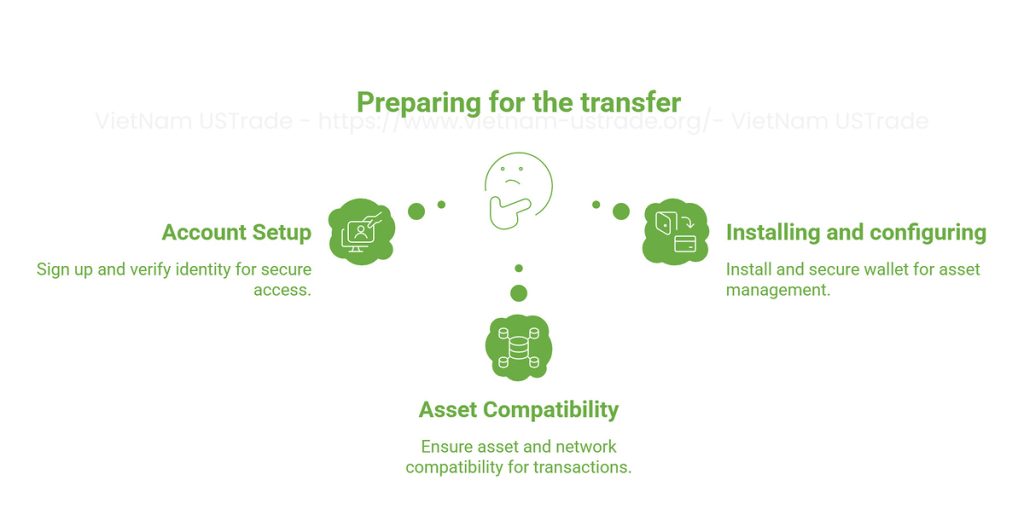
2. Preparing for the transfer: What you need before sending crypto
Before sending crypto from Coinbase to Coinbase Wallet, make sure your accounts and wallet are set up properly and compatible with the asset you want to transfer.
Get ready to transfer accounts, apps, networks, and fees
2.1 Setting up and verifying your Coinbase account
Sign up for a Coinbase account at coinbase.com.
Complete identity verification (KYC) by uploading your government ID.
Set up two-factor authentication (2FA) for added security.
2.2 Installing and configuring Coinbase Wallet
Download the Coinbase Wallet app from the App Store or Google Play.
Create a new wallet and securely back up your 12-word seed phrase (write it down, keep it safe offline).
Set your security pin or enable biometrics for fast access.
2.3 Checking asset compatibility and network requirements
Verify that the specific asset you want to transfer is supported by both Coinbase and Coinbase Wallet (e.g., ETH, USDC, select ERC-20 tokens).
Choose the appropriate blockchain network (e.g., Ethereum mainnet, Polygon, Base) and ensure your wallet can receive on that chain.
Double-check for supported networks in recent Coinbase docs, as compatibility can change year to year.
2.4 Understanding fees and transfer limits
Sending crypto from Coinbase involves paying network (gas) fees, which fluctuate by blockchain and network congestion. You may also encounter minimum and maximum transfer limits, especially for new accounts. View real-time fee estimates and limits during the send process or in Coinbase’s help center to avoid surprises:
Network/gas fees may vary (Ethereum often has higher fees than Polygon or Base).
Transfer limits depend on account tier and verification status.
Use Coinbase’s support pages for asset-specific details and fee updates.
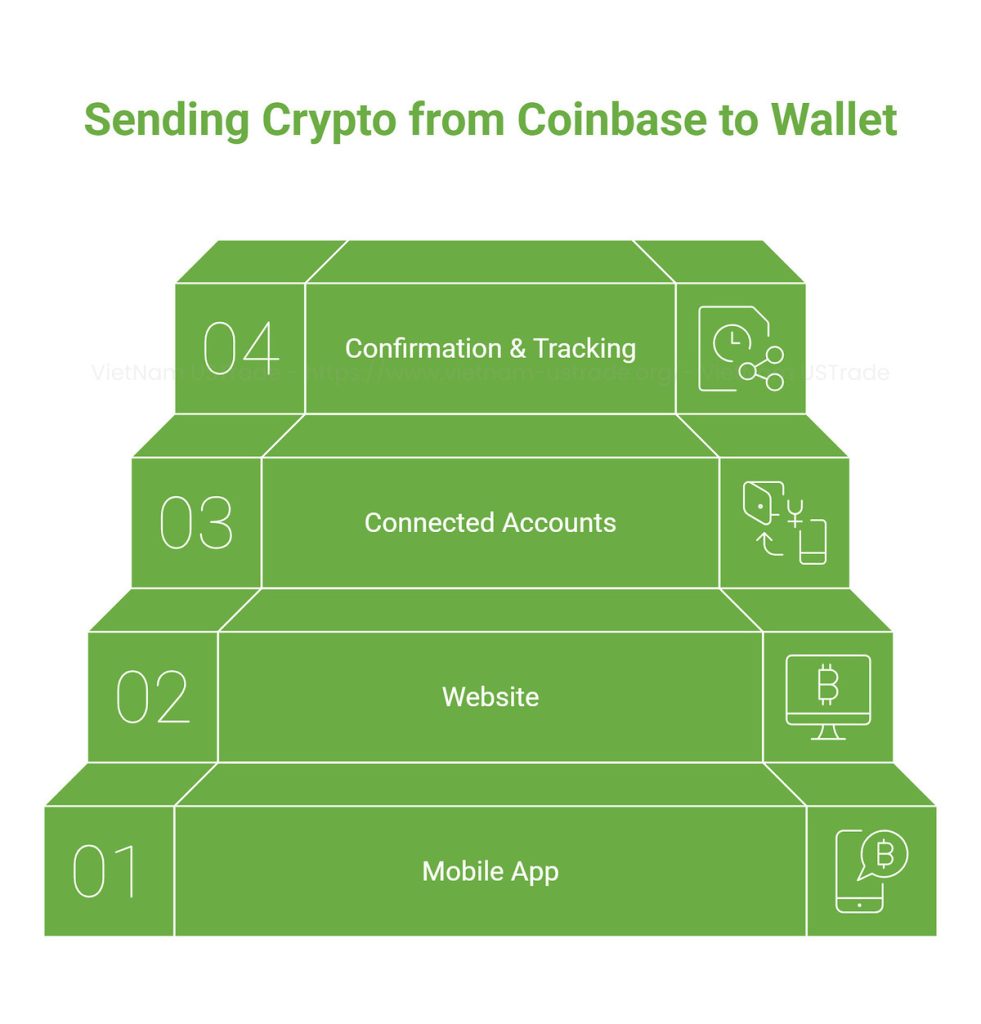
3. Step-by-step guide: How to send crypto from Coinbase to Coinbase Wallet
Here’s a complete breakdown of how to make your transfer via mobile app, website, or using the Connected Accounts feature.
Follow clear steps to move crypto from Coinbase to Wallet
3.1 Sending via the Coinbase mobile app
The most common way of sending crypto from Coinbase to Coinbase Wallet is through the mobile app due to its convenience and accessibility.
Open the Coinbase app and sign in to your account.
On the home screen, tap the “Send” button.
Select the crypto asset you’d like to transfer (e.g., ETH, USDC).
Enter the amount to send.
Paste or scan your Coinbase Wallet address (use the Wallet app’s “Receive” feature to access your QR code).
Double-check the network selection (for compatible coins, choose ETH, Polygon, or Base as appropriate).
Review the transaction details, including estimated fees and the recipient address.
Tap “Send now” or “Confirm” to submit. You can track the transfer’s status on the app’s activity tab or via a blockchain explorer.
3.2 Sending via the Coinbase website
Log in to your Coinbase account on the desktop website.
Click on “Send/Receive” in the main dashboard.
Choose the asset and amount you wish to send.
Enter your Coinbase Wallet address in the “To” field (copy-paste from your Wallet app for accuracy).
Select the correct network (matching what your Wallet supports).
Review all details, including fees and addresses, and click “Send” or “Confirm.”
3.3 Using the Coinbase Wallet Connected Accounts feature
Coinbase Wallet offers a “Connected Accounts” feature to link directly with your Coinbase exchange account. This allows instant transfers right within the Wallet app:
Open Coinbase Wallet and go to “Settings” > “Connected Accounts.”
Follow the prompts to sign in and authorize the connection to your Coinbase account.
Tap the transfer button, select an asset, and move funds instantly between Coinbase and your Wallet (no need to scan addresses).
This feature simplifies asset movement but may be limited to select tokens and networks based on 2025 updates.
3.4 Confirmation times and transaction tracking
Most sending crypto from Coinbase to Coinbase Wallet actions complete in a few seconds to a few minutes, depending on the network:
Ethereum and congested networks may take up to 30 minutes during peak demand.
Track transaction progress in your Coinbase app or Wallet app’s transaction history.
Use a blockchain explorer (like Etherscan) to verify confirmations if a transfer seems slow.
If a transfer is pending unusually long, check network status or Coinbase support for known incidents.
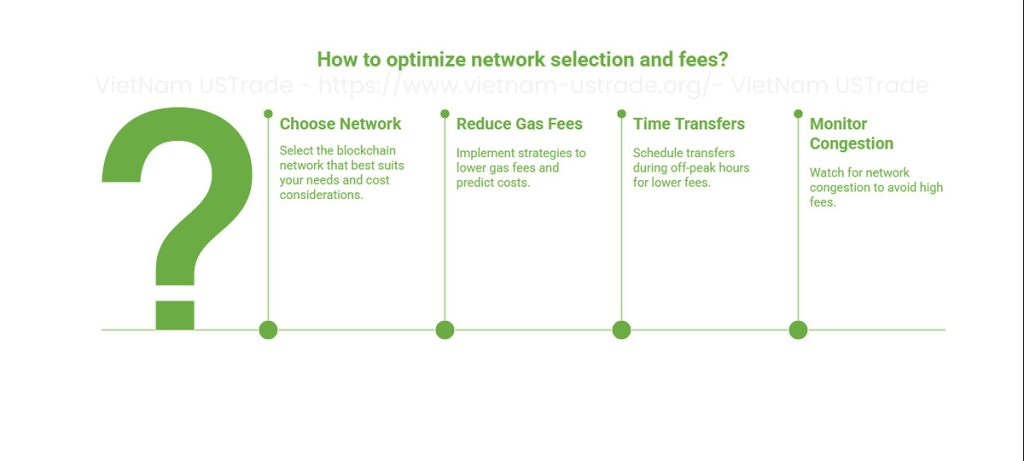
4. Optimizing network selection and fees
Choosing the right blockchain and transfer time can help you save significantly on fees.
Pick the right network and save on fees
4.1 Choosing the right blockchain network
When sending crypto from Coinbase to Coinbase Wallet, selecting the right blockchain can drastically reduce gas fees.. For example, sending ETH on Ethereum mainnet may cost several dollars in gas, while using Base or Polygon typically costs pennies. Select the network that matches your asset and your recipient wallet’s compatibility:
Asset
Ethereum
Polygon
Base
ETH
✔
✔ (bridged)
✔
USDC
✔
✔
✔
Other ERC-20
✔
Sometimes
Sometimes
4.2 Tips to reduce and predict gas fees
Transfer during off-peak hours (e.g., early UTC mornings) when blockchain traffic and gas rates are low.
Check live fee estimators (such as Etherscan’s Gas Tracker).
Batch transfers or consolidate multiple sends into one to reduce total fees, if possible.
4.3 Timing your transfers for cost efficiency
Crypto transaction fees and speeds can change rapidly. Typically, sending crypto during weekends or non-business hours avoids the congestion caused by traders and DeFi activity. Monitoring real-time network data saves you money and headaches:
Best times: Low global usage hours, weekends, major holidays.
Worst times: During major crypto events, U.S. stock market hours, or breaking news.
4.4 Network congestion: What to watch for
Network congestion increases gas fees and slows transfers.
Monitor congestion using network analytics (Etherscan, PolygonScan, BaseScan) and in-app notifications.
If fees spike, consider waiting or switching to a less-congested network for your transfer.
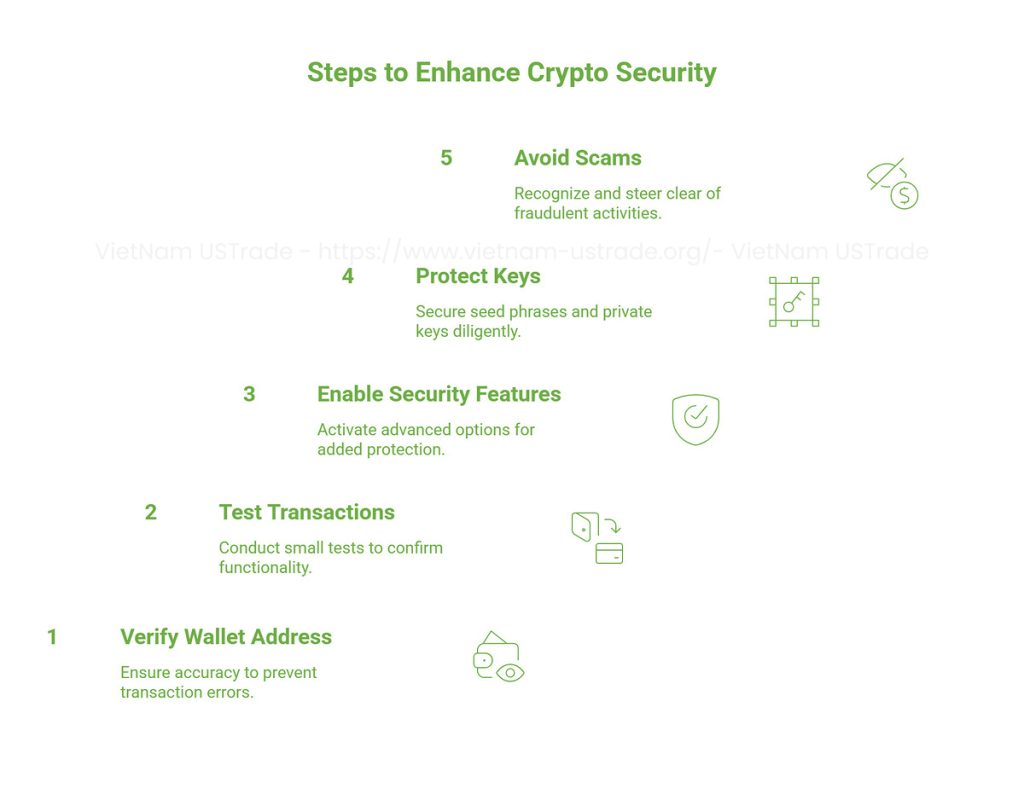
5. Advanced security and safety practices
Taking extra security precautions is essential when self-managing crypto assets.
Secure your assets with smart safety habits
5.1 How to verify and enter the correct wallet address
Always copy-paste your Coinbase Wallet address from within the Wallet app (never type it by hand).
Double-check that the address matches (compare the first and last 6 characters).
Don’t share your address via unsecured messaging apps. Use QR codes or clipboard features.
If possible, test with a small transfer before sending your full amount (see below).
5.2 Test transactions and why they matter
Before sending crypto from Coinbase to Coinbase Wallet in large amounts, test with a small amount to verify address and network accuracy.. This ensures your asset and network selections are correct, and your funds arrive safely:
Send a minimal amount (like $1 worth) to your Coinbase Wallet.
Wait for confirmation.
Once verified, send the remainder.
5.3 Enabling and using advanced security features
Strengthen your crypto defenses with advanced features:
Enable two-factor authentication on your Coinbase account and Wallet app.
Set a unique, complex password and change it regularly.
Turn on app-specific security (PIN, biometrics) for the Wallet app.
Use hardware wallet integration if storing large amounts long-term.
5.4 Best practices for seed phrase and private key protection
Always write down your seed phrase on paper, store offline, and never share it digitally.
Backup the seed phrase in multiple safe and geographically separate locations.
Consider using a fireproof and waterproof safe, or a metal seed storage device.
Never enter your seed phrase into any website, Google Form, or app except your official Coinbase Wallet app.
5.5 Recognizing and avoiding common scams
Be wary of fake “Coinbase support” messages or calls Coinbase never asks for your seed phrase.
Always confirm URLs look for the official Coinbase.com or trusted app marketplace links.
Ignore unsolicited DMs or emails offering to recover lost funds or guarantee returns.
Use added caution when clicking blockchain explorer links double-check before acting on prompts.
6. Troubleshooting common issues when sending crypto
Sometimes things go wrong. Here’s how to recover or avoid common issues when sending crypto from Coinbase to Coinbase Wallet.
6.1 What to do if a transfer is stuck or delayed
If sending crypto from Coinbase to Coinbase Wallet seems delayed, check the blockchain explorer for real-time status.
Check whether the transaction is pending on a blockchain explorer.
Verify network congestion levels delays are often temporary during high traffic.
If delayed over an hour, contact Coinbase support with your transaction ID (TXID).
Ensure your receiving address was entered correctly (wrong networks may cause failed transfers).
6.2 Address verification and mistakes
If you think you entered the wrong address, immediately check the blockchain explorer for status.
For minor mistakes (e.g., missing memo for certain assets), funds may be recoverable by Coinbase support open a ticket with full details.
Never send to an exchange or unsupported third-party wallet address; these mistakes are often irreversible.
6.3 Unsupported assets and other transfer failures
If you try to send a coin that isn’t recognized by Coinbase Wallet, the transfer will fail or funds will be lost.
Always check asset and network compatibility before sending; some tokens may only exist on certain chains.
Consult Coinbase’s current support list or in-app prompts before completing your send.
6.4 Recovering from sending to the wrong address
If you accidentally send crypto to the wrong address on the blockchain, the transaction is, by design, irreversible (this is part of crypto’s security model). Unfortunately, funds sent to an unintended recipient are typically lost unless you have a direct relationship with the receiving party. If the transfer was to another platform, contact their support with full details and your TXID immediately sometimes, they can help. Make test transactions and thorough checks a habit to minimize risk.
7. Managing your crypto in Coinbase Wallet after transfer
Once your crypto is safely in your wallet, you can unlock a wide range of use cases from DeFi to staking.
7.1 Viewing and organizing received assets
Open your Coinbase Wallet app dashboard.
Check the “Assets” tab for newly received tokens or coins.
Organize wallets and assets using in-app management tools.
7.2 Connecting to DeFi, NFTs, and advanced features
With self-custody, you can unlock Web3 features right from your wallet:
Access decentralized finance (DeFi) apps to earn yield, borrow, or lend.
Connect to NFT marketplaces like OpenSea to buy, sell, or view collectables.
Explore blockchain games and investment dApps directly from within the Wallet app.
7.3 Staking and earning with Coinbase Wallet
Access dApps or protocols directly from the Wallet’s “Explore” section.
Select a supported asset like ETH or SOL for staking, following in-app instructions.
Earn rewards while maintaining full control of your staked coins (not all networks supported; check compatibility).
7.4 Sending crypto back to Coinbase or other platforms
If you ever want to move your crypto back to Coinbase (for trading or conversion to fiat) or send it to another exchange/wallet, use the Wallet app’s “Send” feature. Enter the recipient’s address, select network compatibility, and confirm details. Always be sure to match the blockchain network to the recipient’s supported options to avoid loss.
After sending crypto from Coinbase to Coinbase Wallet, users can always reverse the process if needed just follow similar steps in the Wallet app.
8. When should you keep crypto on Coinbase vs. move to Coinbase Wallet?
Each option has its pros and cons depending on your goals and trading style.
8.1 Trading, access, and security considerations
Scenario
Coinbase (Exchange)
Coinbase Wallet
Best For
Active trading, instant buy/sell
Storing, DeFi/NFTs, long-term hold
Security
Coinbase-managed, insured hot/cold wallets
User self-managed, full control
Recovery
Via email/ID, customer support
Seed phrase only
8.2 Tax, compliance, and reporting differences
Crypto held on Coinbase is fully tracked, making tax reporting straightforward with downloadable spreadsheets and built-in summaries. Assets in Coinbase Wallet are off-exchange, and transactions through DeFi or DApps may complicate reporting. For example, trading NFTs or earning DeFi yield directly in your wallet could trigger complex taxable events not auto-tracked by Coinbase. Always keep detailed records and consult a tax professional for 2025’s evolving regulations.
8.3 Feature availability and cost comparison
Coinbase Exchange: Pro easy fiat conversions, high liquidity, insured custodianship. Con less privacy, higher withdrawal fees for certain coins.
Coinbase Wallet: Pro direct DeFi and Web3 access, absolute control, more privacy. Con self-managed security, more complex tax/reporting, full responsibility for private keys.
9. FAQs: Sending Crypto from Coinbase to Coinbase Wallet
9.1 How long do transfers take?
Most transfers complete within a few minutes, but timings depend on network congestion and blockchain choice. Ethereum mainnet can take several minutes in busy periods; networks like Base or Polygon are usually faster.
9.2 Are there limits on transfer amounts?
Yes. Limits depend on your account’s verification status and asset type. You’ll see any relevant limits during the transfer process for transparency.
9.3 Can I transfer all cryptocurrencies?
No, only supported assets and networks can be transferred. Always check Coinbase and Wallet’s official asset compatibility lists for 2025 before sending.
9.4 What if I lose access to my Coinbase Wallet?
Access can only be recovered with your seed phrase! If lost, Coinbase can’t restore Wallet access store it securely offline and never share it.
9.5 Is moving crypto taxable?
Simply transferring crypto from your Coinbase account to Coinbase Wallet (your own wallet) is generally not a taxable event. Taxable events may occur when you trade, sell, or use your crypto in DeFi/NFT apps, so track all activity for compliance.
10. Conclusion
Sending crypto from Coinbase to Coinbase Wallet gives you full control over your digital assets and access to the broader crypto economy. In this guide, we’ve walked through the essential steps, tools, and precautions to ensure a safe, cost-effective transfer.
Here’s a quick checklist to remember:
Set up and verify both Coinbase and Coinbase Wallet
Choose the correct asset and network
Understand gas fees and transfer limits
Use Connected Accounts for convenience
Always double-check wallet addresses
Protect your seed phrase and test before large transfers
We hope this guide helps you transfer safely and confidently. Feel free to drop your questions or share your experience in the comments your insights help others too.
Web Tai Chinh is a portal that updates news and information related to finance quickly and accurately, helping users have an overview before investing, clearly understanding concepts and terms related to Finance. Explore more insights in our Cryptocurrency category, start your crypto wallet development journey today with the right partner for long-term success.
📞 Contact: 055 937 9204
✉️ Email: webtaichinhvnvn@gmail.com
📍 Address: 13 Ho Tung Mau, An Binh, Di An, Binh Duong